
來研究 UpdateOperation
How it works
基本的用法在前幾篇已經看過了,這邊先來看官方的解說。
CrudController 是一個 RESTful 的 controller,Update Operation 用了兩個 routes:
- GET to
/entity-name/{id}/edit: 指到edit(),用來 render Edit Form(edit.blade.php) - POST to
/entity-name/{id}/edit: 指到update(),使用 Eloquent 去 update database 的 entry
edit() 會 render 所有被定義的 fields(using fields API), 接著在保存時,update() 會對資料作 validation,在 Eloquent Model 創建 entry。只有 field type 被加入,且為 $fiilable 的會被真正存入資料庫。
Advanced Features and Techniques
Validation
backpack 提供三種方式,作為表單驗證的機制。
Validating fields using FormRequests
在產生 CrudController 的時候,會順帶產生一個 Laravel FormRequest,這個 FormRequest 會在 setupUpdateOperation() 裡面被使用。如果是 Article 的話,就是 ArticleRequest::class 。
CRUD::setValidation(ArticleRequest::class);
對於比較大的 model 來說,這個方式很好用,因為可以在 FormRequest 裡面寫很多 rules, messages and attributes,而且不會影響到 CrudController 的大小。
如果今天 Create 和 Update 用來 validate 的方式不一樣,就要創建不同的 request file:
use App\Http\Requests\CreateTagRequest as StoreRequest;
use App\Http\Requests\UpdateTagRequest as UpdateRequest;

// ...

public function setupCreateOperation()
{
    $this->crud->setValidation(CreateRequest::class);
}

public function setupUpdateOperation()
{
    $this->crud->setValidation(UpdateRequest::class);
}
Validating fields using a rules array
如果是小型的 model,要用另一個檔案來管理也蠻麻煩的,此時可以把 rules 直接寫成 array 就好。
protected function setupUpdateOperation()
{
    $this->crud->setValidation([
        'name' => 'required|min:2',
    ]);

    // or maybe
    $rules = ['name' => 'required|min:2'];
    $messages = [
        'name.required' => 'You gotta give it a name, man.',
        'name.min' => 'You came up short. Try more than 2 characters.',
    ];
    $this->crud->setValidation($rules, $messages);
}
Validating fields using field attributes
另一個對於中小型 model 也不錯用的,是直接寫在 addField() 裡面:
protected function setupUpdateOperation()
{
    $this->crud->addField([
        'name' => 'content',
        'label' => 'Content',
        'type' => 'ckeditor',
        'placeholder' => 'Your textarea text here',
        'validationRules' => 'required|min:10',
        'validationMessages' => [
            'required' => 'You gotta write smth man.',
            'min' => 'More than 10 characters, bro. Wtf... You can do this!',
        ]
    ]);
    // CAREFUL! This MUST be called AFTER the fields are defined, NEVER BEFORE
    $this->crud->setValidation();
}
如果使用這個方法的話,一定要在最後 call setValidation(),不用輸入任何 parameter。 Backpack 會自己去這些 field 裡面找對應的 rules。
Callbacks
根據 Backpack 文件的說法,在 entry 被更新之前/之後,我們可能想要最一些事情。
但在 Laravel Backpack 是沒有 callback 可以用的,所以如果要達到這種效果,可以用以下幾種方式。
Use Events in your setup() method
Laravel 已經有提供幾個 events:
updatingandupdated: triggered by the Update operationsavingandsaved: triggered by both the Create and the Update Operations。
舉例來說,如果想要在 Product entry 更新之前做一些事情,可以:
public function setupUpdateOperation()
{

    // ...

    Product::updating(function($entry) {
        $entry->last_edited_by = backpack_user()->id;
    });
}
要注意的是,這些events 只有在 function 被 call 的時候才會 register,所以,如果把它定義在 CrudController:
- they will NOT run when an entry is changed outside that CrudController;
- if you want to expand the scope to cover both the
CreateandUpdateoperations, you can easily do that, for example by using thesavingandsavedevents, and moving the event-calling to your mainsetup()method;
Use Events in your field definition
可以在創建 field 的時候,就告訴 field 在 entry 要存進 db 的時候應該要做些什麼:
// FLUENT syntax - use the convenience method "on" to define just ONE event
CRUD::field('name')->on('updating', function ($entry) {
    $entry->last_edited_by = backpack_user()->id;
});

// FLUENT SYNTAX - you can define multiple events in one go
CRUD::field('name')->events([
    'updating' => function ($entry) {
        $entry->last_edited_by = backpack_user()->id;
    },
    'saved' => function ($entry) {
        // TODO: upload some file
    },
]);

// using the ARRAY SYNTAX, define an array of events and closures
CRUD::addField([
    'name' => 'name',
    'events' => [
        'updating' => function ($entry) {
            $entry->author_id = backpack_user()->id;
        },
    ],
]);
Override the update() method
把 update() 複寫掉:
<?php

namespace App\Http\Controllers\Admin;

use Backpack\CRUD\app\Http\Controllers\CrudController;

class ProductCrudController extends CrudController
{
    use \Backpack\CRUD\app\Http\Controllers\Operations\UpdateOperation { update as traitUpdate; }

    // ...

    public function update()
    {
        // do something before validation, before save, before everything; for example:
        // $this->crud->addField(['type' => 'hidden', 'name' => 'author_id']);
        // $this->crud->removeField('password_confirmation');

        // Note: By default Backpack ONLY saves the inputs that were added on page using Backpack fields.
        // This is done by stripping the request of all inputs that do NOT match Backpack fields for this
        // particular operation. This is an added security layer, to protect your database from malicious
        // users who could theoretically add inputs using DeveloperTools or JavaScript. If you're not properly
        // using $guarded or $fillable on your model, malicious inputs could get you into trouble.

        // However, if you know you have proper $guarded or $fillable on your model, and you want to manipulate
        // the request directly to add or remove request parameters, you can also do that.
        // We have a config value you can set, either inside your operation in `config/backpack/crud.php` if
        // you want it to apply to all CRUDs, or inside a particular CrudController:
            // $this->crud->setOperationSetting('saveAllInputsExcept', ['_token', '_method', 'http_referrer', 'current_tab', 'save_action']);
        // The above will make Backpack store all inputs EXCEPT for the ones it uses for various features.
        // So you can manipulate the request and add any request variable you'd like.
        // $this->crud->getRequest()->request->add(['author_id'=> backpack_user()->id]);
        // $this->crud->getRequest()->request->remove('password_confirmation');
        // $this->crud->getRequest()->request->add(['author_id'=> backpack_user()->id]);
        // $this->crud->getRequest()->request->remove('password_confirmation');

        $response = $this->traitUpdate();
        // do something after save
        return $response;
    }
}
Delete button on Update Operation
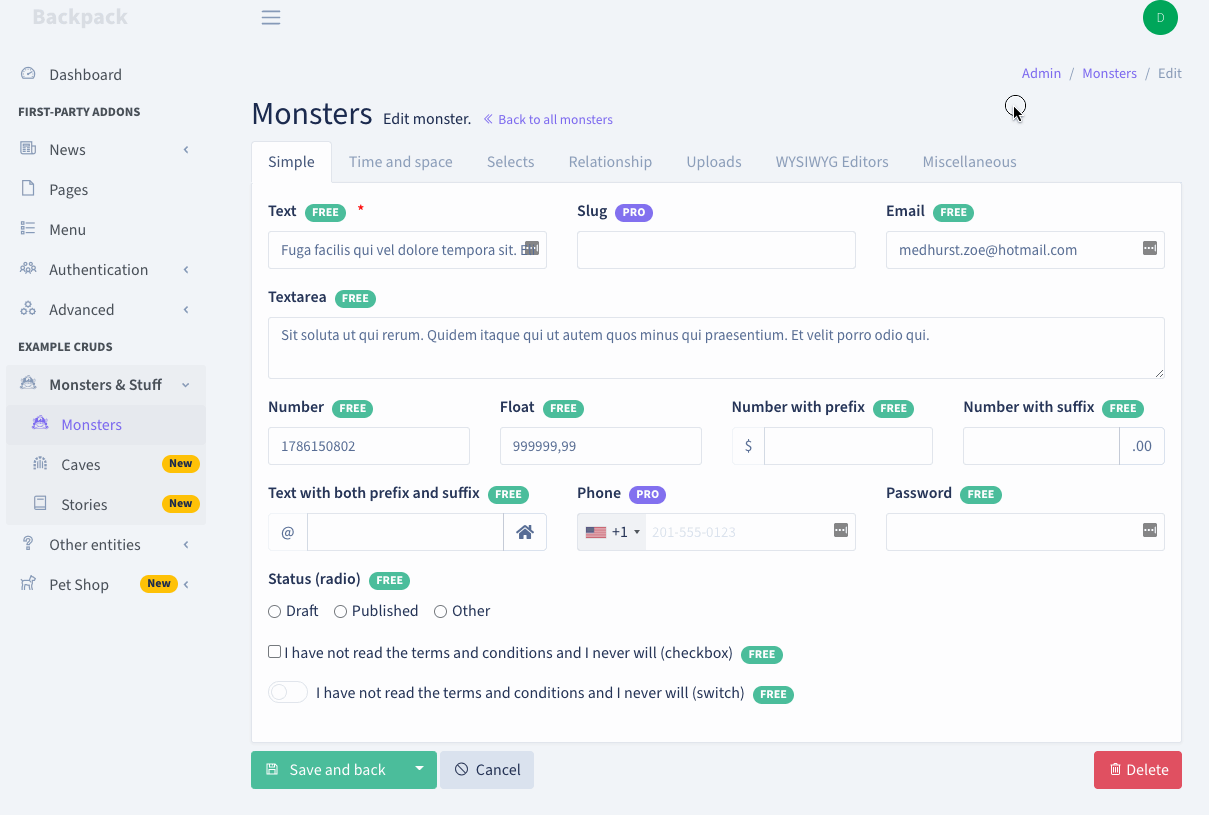
如果想要在 Update operation 裡面顯示 Delete button,需要在 setupUpdateOperation()裡面加上:
    protected function setupUpdateOperation()
    {
        // your code...

        $this->crud->setOperationSetting('showDeleteButton', true); // <--- add this!

        // alternatively you can pass an URL to where user should be redirected after entry is deleted:
        // $this->crud->setOperationSetting('showDeleteButton', 'https://someurl.com');
    }
這可以讓我們可以直接在 update 的畫面刪掉 entries。
Trace Code - UpdateOperation
接著來看 UpdateOperation 這個 trait 裡面的一些 method:
setupUpdateRoutes
protected function setupUpdateRoutes($segment, $routeName, $controller)
{
    Route::get($segment.'/{id}/edit', [
        'as'        => $routeName.'.edit',
        'uses'      => $controller.'@edit',
        'operation' => 'update',
    ]);

    Route::put($segment.'/{id}', [
        'as'        => $routeName.'.update',
        'uses'      => $controller.'@update',
        'operation' => 'update',
    ]);
}
還蠻明顯這個 method 就是在創建兩個 route,一個是 GET:admin/article/{id}/edit,會導到編輯的那一頁。另一個是 PUT: admin/article/{id} ,就是編輯完按下 save 會導到的 route。
不過我還蠻好奇這個 method 是在哪裡被 call 的,因為只要一創建 crudController,就會馬上有 route 可以用。
後來發現一開始是在 EntityCrudController 所繼承的 CrudController 裡面的__construct():
public function __construct()
    {
        if ($this->crud) {
            return;
        }

        // ---------------------------
        // Create the CrudPanel object
        // ---------------------------
        // Used by developers inside their ProductCrudControllers as
        // $this->crud or using the CRUD facade.
        //
        // It's done inside a middleware closure in order to have
        // the complete request inside the CrudPanel object.
        $this->middleware(function ($request, $next) {
            $this->crud = app('crud');

            $this->crud->setRequest($request);

            $this->setupDefaults();
            $this->setup();
            $this->setupConfigurationForCurrentOperation();

            return $next($request);
        });
    }
這個裡面會 call setup(),但目前這個 parent class 的 setup()沒有實作,所以要去看各 crudController 的 setup(),這裡用 article 為例:
public function setup()
{
    CRUD::setModel(\App\Models\Article::class);
    CRUD::setRoute(config('backpack.base.route_prefix') . '/article');
    CRUD::setEntityNameStrings('article', 'articles');
}
這裡會 call setRoute(),而 setRoute() 是在 parent class(CrudController) 所 implement 的:
public function setupRoutes($segment, $routeName, $controller)
    {
        preg_match_all('/(?<=^|;)setup([^;]+?)Routes(;|$)/', implode(';', get_class_methods($this)), $matches);

        if (count($matches[1])) {
            foreach ($matches[1] as $methodName) {
                $this->{'setup'.$methodName.'Routes'}($segment, $routeName, $controller);
            }
        }
    }
可以看到這裡就會 call 'setup'.$methodName.'Routes' 並傳入需要的 parameters。
setupUpdateDefaults
protected function setupUpdateDefaults()
    {
        $this->crud->allowAccess('update');

        $this->crud->operation('update', function () {
            $this->crud->loadDefaultOperationSettingsFromConfig();

            if ($this->crud->getModel()->translationEnabled()) {
                $this->crud->addField([
                    'name' => '_locale',
                    'type' => 'hidden',
                    'value' => request()->input('_locale') ?? app()->getLocale(),
                ]);
            }

            $this->crud->setupDefaultSaveActions();
        });

        $this->crud->operation(['list', 'show'], function () {
            $this->crud->addButton('line', 'update', 'view', 'crud::buttons.update', 'end');
        });
    }
從名字來看大致可以知道,setupUpdateDefaults 負責設定更新操作所需的預設設定。
allowAccess() 允許 CRUDController 有權限可以使用 update。會把操作名稱(update)添加到允許訪問的列表中。在這邊是把 update 設置為允許訪問。
operation()是在定義名為 update 的操作,並用一個 closure 來設定 update 要作什麼事情。
loadDefaultOperationSettingsFromConfig() 就是在 load 配置文件,通常位於 config/backpack/operations,
下面會看 model 有沒有啟用翻譯,如果有的話,會新增一個 hidden 的欄位。這個是用來儲存目前的語言設置(當前選擇的語言),以便在多語言網頁上正確更新相應的翻譯。
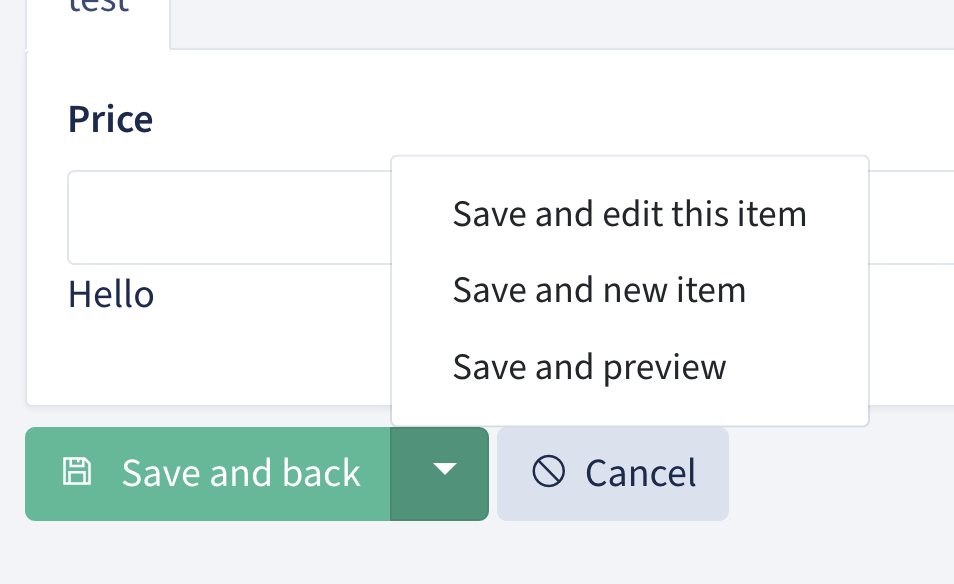
setupDefaultSaveActions()主要用於設置 default 的保存操作。包含 save_and_back 、save_and_edit、save_and_new。
這個 setupDefaultSaveActions() 會在 Save and back 按鈕旁邊的小箭頭出現,如下圖:
最後,在 operation 是 list, show 的情況下,執行 addbutton,也就是 Add a button to the CRUD table view.。
edit
Show the form for editing the specified resource.
    public function edit($id)
    {
        $this->crud->hasAccessOrFail('update');
        // get entry ID from Request (makes sure its the last ID for nested resources)
        $id = $this->crud->getCurrentEntryId() ?? $id;
        // get the info for that entry

        $this->data['entry'] = $this->crud->getEntryWithLocale($id);
        $this->crud->setOperationSetting('fields', $this->crud->getUpdateFields());

        $this->data['crud'] = $this->crud;
        $this->data['saveAction'] = $this->crud->getSaveAction();
        $this->data['title'] = $this->crud->getTitle() ?? trans('backpack::crud.edit').' '.$this->crud->entity_name;
        $this->data['id'] = $id;

        // load the view from /resources/views/vendor/backpack/crud/ if it exists, otherwise load the one in the package
        return view($this->crud->getEditView(), $this->data);
    }
edit() 會寫在對應的 route 裡面:
Route::get($segment.'/{id}/edit', [
    'as'        => $routeName.'.edit',
    'uses'      => $controller.'@edit',
    'operation' => 'update',
]);
這邊其實就寫了當 user 輸入這個 url,會 call edit 這個 method。
首先進入 edit,會檢查是否可以 access update(在 setupUpdateDefaults() 裡面會新增)。如果沒有就不能編輯。
接著會取得 id,知道要編輯哪個 entry。
接著,使用 getEntryWithLocale() 得到特定語言區域的資源。這個 method 會先看是否已經有 entry,還沒有的話會 call getEntry() 來拿到 entry。接著,會去看這個 entry 是否支援翻譯,然後從request 去找可用語言區域列表。如果有的話,會用 setLocale($locale)將語言區域設置為 request 指定的語言區域。
下面的 setOperationSetting() 會把 operation 存成 key-value store,這樣之後可以方便查找。
然後再下面的程式碼,主要就是把一些資訊存進 data,並在最後一起傳到 view 裡面。
而 getEditView() 的實現如下:
public function getEditView()
{
    return $this->get('update.view') ?? 'crud::edit';
}
看起來就是先檢查使用者有沒有自定義 update view,如果沒有的話,就用 backpack 預設的。
官方文件 上有寫一些方法,關於創建如何客製化自己的 view。
$this->crud->setShowView('your-view');
$this->crud->setEditView('your-view');
$this->crud->setCreateView('your-view');
$this->crud->setListView('your-view');
$this->crud->setReorderView('your-view');
$this->crud->setDetailsRowView('your-view');
update
Update the specified resource in the database.
public function update()
{
    $this->crud->hasAccessOrFail('update');

    // execute the FormRequest authorization and validation, if one is required
    $request = $this->crud->validateRequest();

    // register any Model Events defined on fields
    $this->crud->registerFieldEvents();

    // update the row in the db
    $item = $this->crud->update(
        $request->get($this->crud->model->getKeyName()),
        $this->crud->getStrippedSaveRequest($request)
    );
    $this->data['entry'] = $this->crud->entry = $item;

    // show a success message
    \Alert::success(trans('backpack::crud.update_success'))->flash();

    // save the redirect choice for next time
    $this->crud->setSaveAction();

    return $this->crud->performSaveAction($item->getKey());
}
跟上面的 edit() 一樣,update 會先檢查有沒有 access。
如果有的話,那就 call validateRequest() 來驗證輸入,這邊的驗證會同時看 FormRequst 和寫在裡面的 rules。
驗證通過後,會 call regusterFieldEvents() ,看起來是會把在 field 裡面有定義的所有 Eloquent Model Events 註冊。在上面的 [[#^eb7633|Callback]] 有提到怎麼定義 Eloquent Model Events。
接著會 call update() 把資料存進 db 裡面,getStrippedSaveRequest() 是會把 request 做一些處理。
存進 db 後,會再把更新後的 entry 存到 data[],方便後續的操作。
最後就是顯示 flash message 並 redirect ㄌ。
結語
- 程式碼蠻多的,但愈看愈有感覺,因為前面原本沒有很了解的東西,都會慢慢能了解實作。但也不知道要挖到多深就是ㄌ。
- 好像可以去研究一下 Laravel Form Request Validation 和 Eloquent Events。